REF: http://2ality.com/2015/02/es6-classes-final.html
Recently, TC39 decided on the final semantics of classes in ECMAScript 6 [1]. This blog post explains how their final incarnation works. The most significant recent changes were related to how subclassing is handled.
Overview
class Point {
    constructor(x, y) {
        this.x = x;
        this.y = y;
    }
    toString() {
        return '(' + this.x + ', ' + this.y + ')';
    }
}

class ColorPoint extends Point {
    constructor(x, y, color) {
        super(x, y);
        this.color = color;
    }
    toString() {
        return super.toString() + ' in ' + this.color;
    }
}

let cp = new ColorPoint(25, 8, 'green');
cp.toString(); // '(25, 8) in green'

console.log(cp instanceof ColorPoint); // true
console.log(cp instanceof Point); // true
The essentials
Base classes
A class is defined like this in ECMAScript 6 (ES6):
class Point {
    constructor(x, y) {
        this.x = x;
        this.y = y;
    }
    toString() {
        return '(' + this.x + ', ' + this.y + ')';
    }
}
You use this class just like an ES5 constructor function:
> var p = new Point(25, 8);
> p.toString()
'(25, 8)'
In fact, the result of a class definition is a function:
> typeof Point
'function'
However, you can only invoke a class via new, not via a function call (Sect. 9.2.2 in the spec):
> Point()
TypeError: Classes can’t be function-called
Class declarations are not hoisted
Function declarations are hoisted: When entering a scope, the functions that are declared in it are immediately available – independently of where the declarations happen. That means that you can call a function that is declared later:
foo(); // works, because `foo` is hoisted

function foo() {}
In contrast, class declarations are not hoisted. Therefore, a class only exists after execution reached its definition and it was evaluated. Accessing it beforehand leads to a ReferenceError:
new Foo(); // ReferenceError

class Foo {}
The reason for this limitation is that classes can have an extends clause whose value is an arbitrary expression. That expression must be evaluated in the proper “location”, its evaluation can’t be hoisted.
Not having hoisting is less limiting than you may think. For example, a function that comes before a class declaration can still refer to that class, but you have to wait until the class declaration has been evaluated before you can call the function.
function functionThatUsesBar() {
    new Bar();
}

functionThatUsesBar(); // ReferenceError
class Bar {}
functionThatUsesBar(); // OK
Class expressions
Similarly to functions, there are two kinds of class definitions, two ways to define a class: class declarations and class expressions.
Also similarly to functions, the identifier of a class expression is only visible within the expression:
const MyClass = class Me {
    getClassName() {
        return Me.name;
    }
};
let inst = new MyClass();
console.log(inst.getClassName()); // Me
console.log(Me.name); // ReferenceError: Me is not defined
Inside the body of a class definition
A class body can only contain methods, but not data properties. Prototypes having data properties is generally considered an anti-pattern, so this just enforces a best practice.
constructor, static methods, prototype methods
Let’s examine three kinds of methods that you often find in class literals.
class Foo {
    constructor(prop) {
        this.prop = prop;
    }
    static staticMethod() {
        return 'classy';
    }
    prototypeMethod() {
        return 'prototypical';
    }
}
let foo = new Foo(123);
The object diagram for this class declaration looks as follows. Tip for understanding it: [[Prototype]] is an inheritance relationship between objects, while prototype is a normal property whose value is an object. The property prototype is only special because the new operator uses its value as the prototype for instances it creates.

First, the pseudo-method constructor. This method is special, as it defines the function that represents the class:
> Foo === Foo.prototype.constructor
true
> typeof Foo
'function'
It is sometimes called a class constructor. It has features that normal constructor functions don’t have (mainly the ability to constructor-call its super-constructor via super(), which is explained later).
Second, static methods. Static properties (or class properties) are properties of Foo itself. If you prefix a method definition with static, you create a class method:
> typeof Foo.staticMethod
'function'
> Foo.staticMethod()
'classy'
Third, prototype methods. The prototype properties of Foo are the properties of Foo.prototype. They are usually methods and inherited by instances of Foo.
> typeof Foo.prototype.prototypeMethod
'function'
> foo.prototypeMethod()
'prototypical'
Getters and setters
The syntax for getters and setters is just like in ECMAScript 5 object literals:
class MyClass {
    get prop() {
        return 'getter';
    }
    set prop(value) {
        console.log('setter: '+value);
    }
}
You use MyClass as follows.
> let inst = new MyClass();
> inst.prop = 123;
setter: 123
> inst.prop
'getter'
Computed method names
You can define the name of a method via an expression, if you put it in square brackets. For example, the following ways of defining Foo are all equivalent.
class Foo {
    myMethod() {}
}

class Foo {
    ['my'+'Method']() {}
}

const m = 'myMethod';
class Foo {
    [m]() {}
}
Several special methods in ECMAScript 6 have keys that are symbols [2]. Computed method names allow you to define such methods. For example, if an object has a method whose key is Symbol.iterator, it is iterable [3]. That means that its contents can be iterated over by the for-of loop and other language mechanisms.
class IterableClass {
    [Symbol.iterator]() {
        ···
    }
}
Generator methods
If you prefix a method definition with an asterisk (*), it becomes a generator method [3:1]. Among other things, a generator is useful for defining the method whose key is Symbol.iterator. The following code demonstrates how that works.
class IterableArguments {
    constructor(...args) {
        this.args = args;
    }
    * [Symbol.iterator]() {
        for (let arg of this.args) {
            yield arg;
        }
    }
}

for (let x of new IterableArguments('hello', 'world')) {
    console.log(x);
}

// Output:
// hello
// world
Subclassing
The extends clause lets you create a subclass of an existing constructor (which may or may not have been defined via a class):
class Point {
    constructor(x, y) {
        this.x = x;
        this.y = y;
    }
    toString() {
        return '(' + this.x + ', ' + this.y + ')';
    }
}

class ColorPoint extends Point {
    constructor(x, y, color) {
        super(x, y); // (A)
        this.color = color;
    }
    toString() {
        return super.toString() + ' in ' + this.color; // (B)
    }
}
Again, this class is used like you’d expect:
> let cp = new ColorPoint(25, 8, 'green');
> cp.toString()
'(25, 8) in green'

> cp instanceof ColorPoint
true
> cp instanceof Point
true
There are two kinds of classes:
Pointis a base class, because it doesn’t have anextendsclause.ColorPointis a derived class.
There are two ways of using super:
- A class constructor (the pseudo-method
constructorin a class literal) uses it like a function call (super(···)), in order to make a super-constructor call (line A). - Method definitions (in object literals or classes, with or without
static) use it like property references (super.prop) or method calls (super.method(···)), in order to refer to super-properties (line B).
The prototype of a subclass is the superclass
The prototype of a subclass is the superclass in ECMAScript 6:
> Object.getPrototypeOf(ColorPoint) === Point
true
That means that static properties are inherited:
class Foo {
    static classMethod() {
        return 'hello';
    }
}

class Bar extends Foo {
}
Bar.classMethod(); // 'hello'
You can even super-call static methods:
class Foo {
    static classMethod() {
        return 'hello';
    }
}

class Bar extends Foo {
    static classMethod() {
        return super.classMethod() + ', too';
    }
}
Bar.classMethod(); // 'hello, too'
Super-constructor calls
In a derived class, you must call super() before you can use this:
class Foo {}

class Bar extends Foo {
    constructor(num) {
        let tmp = num * 2; // OK
        this.num = num; // ReferenceError
        super();
        this.num = num; // OK
    }
}
Implicitly leaving a derived constructor without calling super() also causes an error:
class Foo {}

class Bar extends Foo {
    constructor() {
    }
}

let bar = new Bar(); // ReferenceError
Overriding the result of a constructor
Just like in ES5, you can override the result of a constructor by explicitly returning an object:
class Foo {
    constructor() {
        return Object.create(null);
    }
}
console.log(new Foo() instanceof Foo); // false
If you do so, it doesn’t matter whether this has been initialized or not. In other words: you don’t have to call super() in a derived constructor if you override the result in this manner.
Default constructors for classes
If you don’t specify a constructor for a base class, the following definition is used:
constructor() {}
For derived classes, the following default constructor is used:
constructor(...args) {
    super(...args);
}
Subclassing built-in constructors
In ECMAScript 6, you can finally subclass all built-in constructors (there are work-arounds for ES5, but these have significant limitations).
For example, you can now create your own exception classes (that will inherit the feature of having a stack trace in most engines):
class MyError extends Error {
}
throw new MyError('Something happened!');
You can also create subclasses of Array whose instances properly handle length:
class MyArray extends Array {
    constructor(len) {
        super(len);
    }
}

// Instances of of `MyArray` work like real arrays:
let myArr = new MyArray(0);
console.log(myArr.length); // 0
myArr[0] = 'foo';
console.log(myArr.length); // 1
Note that subclassing built-in constructors is something that engines have to support natively, you won’t get this feature via transpilers.
The details of classes
What we have seen so far are the essentials of classes. You only need to read on if you are interested how things happen under the hood. Let’s start with the syntax of classes. The following is a slightly modified version of the syntax shown in Sect. A.4 of the ECMAScript 6 specification.
ClassDeclaration:
    "class" BindingIdentifier ClassTail
ClassExpression:
    "class" BindingIdentifier? ClassTail

ClassTail:
    ClassHeritage? "{" ClassBody? "}"
ClassHeritage:
    "extends" AssignmentExpression
ClassBody:
    ClassElement+
ClassElement:
    MethodDefinition
    "static" MethodDefinition
    ";"

MethodDefinition:
    PropName "(" FormalParams ")" "{" FuncBody "}"
    "*" PropName "(" FormalParams ")" "{" GeneratorBody "}"
    "get" PropName "(" ")" "{" FuncBody "}"
    "set" PropName "(" PropSetParams ")" "{" FuncBody "}"

PropertyName:
    LiteralPropertyName
    ComputedPropertyName
LiteralPropertyName:
    IdentifierName  /* foo */
    StringLiteral   /* "foo" */
    NumericLiteral  /* 123.45, 0xFF */
ComputedPropertyName:
    "[" Expression "]"
Two observations:
- The value to be extended can be produced by an arbitrary expression. Which means that you’ll be able to write code such as the following:
class Foo extends combine(MyMixin, MySuperClass) {} - Semicolons are allowed between methods.
Various checks
- Error checks: the class name cannot be
evalorarguments; duplicate class element names are not allowed; the nameconstructorcan only be used for a normal method, not for a getter, a setter or a generator method. - Classes can’t be function-called. They throw a
TypeExceptionif they are. - Prototype methods cannot be used as constructors:
class C {
    m() {}
}
new C.prototype.m(); // TypeError
Attributes of properties
Class declarations create (mutable) let bindings. For a given class Foo:
- Static methods
Foo.*are writable and configurable, but not enumerable. Making them writable allows for dynamic patching. - A constructor and the object in its property
prototypehave an immutable link:Foo.prototypeis non-writeable, non-enumerable, non-configurable.Foo.prototype.constructoris non-writeable, non-enumerable, non-configurable.
- Prototype methods
Foo.prototype.*are writable and configurable, but not enumerable.
Note that method definitions in object literals produce enumerable properties.
The details of subclassing
In ECMAScript 6, subclassing looks as follows.
class Point {
    constructor(x, y) {
        this.x = x;
        this.y = y;
    }
    ···
}

class ColorPoint extends Point {
    constructor(x, y, color) {
        super(x, y);
        this.color = color;
    }
    ···
}

let cp = new ColorPoint(25, 8, 'green');
This code produces the following objects.
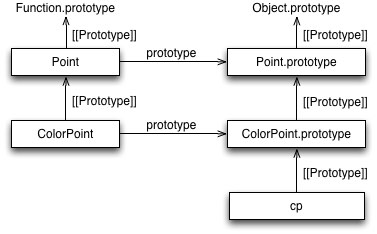
The next subsection examines the prototype chains (in the two columns), the subsection after that examines how cp is allocated and initialized.
Prototype chains
In the diagram, you can see that there are two prototype chains (objects linked via the [[Prototype]] relationship, which is an inheritance relationship):
- Left column: classes (functions). The prototype of a derived class is the class it extends. The prototype of a base class is
Function.prototype, which is also the prototype of functions:> const getProto = Object.getPrototypeOf.bind(Object); > getProto(Point) === Function.prototype true > getProto(function () {}) === Function.prototype true - Right column: the prototype chain of the instance. The whole purpose of a class is to set up this prototype chain. The prototype chain ends with
Object.prototype(whose prototype isnull), which is also the prototype of objects created via object literals:> const getProto = Object.getPrototypeOf.bind(Object); > getProto(Point.prototype) === Object.prototype true > getProto({}) === Object.prototype true
The prototype chain in the left column leads to static properties being inherited.
Allocating and initializing the instance object
The data flow between class constructors is different from the canonical way of subclassing in ES5. Under the hood, it roughly looks as follows.
// Instance is allocated here
function Point(x, y) {
    // Performed before entering this constructor:
    this = Object.create(new.target.prototype);

    this.x = x;
    this.y = y;
}
···

function ColorPoint(x, y, color) {
    // Performed before entering this constructor:
    this = uninitialized;

    this = Reflect.construct(Point, [x, y], new.target); // (A)
        // super(x, y);

    this.color = color;
}
Object.setPrototypeOf(ColorPoint, Point);
···

let cp = Reflect.construct( // (B)
             ColorPoint, [25, 8, 'green'],
             ColorPoint);
    // let cp = new ColorPoint(25, 8, 'green');
The instance object is created in different locations in ES6 and ES5:
- In ES6, it is created in the base constructor, the last in a chain of constructor calls.
- In ES5, it is created in the operand of
new, the first in a chain of constructor calls.
The previous code uses two new ES6 features:
new.targetis an implicit parameter that all functions have. It is to constructor calls whatthisis to method calls.- If a constructor has been directly invoked via
new, its value is that constructor (line B). - If a constructor was called via
super(), its value is thenew.targetof the constructor that made the call (line A). - During a normal function call, it is
undefined. That means that you can usenew.targetto determine whether a function was function-called or constructor-called (vianew). - Inside an arrow function,
new.targetrefers to thenew.targetof the surrounding non-arrow function.
- If a constructor has been directly invoked via
Reflect.construct()[4] lets you do a constructor call while specifyingnew.targetvia the last parameter.
The advantage of this way of subclassing is that it enables normal code to subclass built-in constructors (such as Error and Array). A later section explains why a different approach was necessary.
Safety checks
thisoriginally being uninitialized in derived constructors means that an error is thrown if they accessthisin any way before they have calledsuper().- Once
thisis initialized, callingsuper()produces aReferenceError. This protects you against callingsuper()twice. - If a constructor returns implicitly (without a
returnstatement), the result isthis. Ifthisis uninitialized, aReferenceErroris thrown. This protects you against forgetting to callsuper(). - If a constructor explicitly returns a non-object (including
undefinedandnull), the result isthis(this behavior is required to remain compatible with ES5 and earlier). Ifthisis uninitialized, aTypeErroris thrown. - If a constructor explicitly returns an object, it is used as its result. Then it doesn’t matter whether
thisis initialized or not.
The extends clause
Let’s examine how the extends clause influences how a class is set up (Sect. 14.5.14 of the spec).
The value of an extends clause must be “constructible” (invocable via new). null is allowed, though.
class C {
}
- Constructor kind: base
- Prototype of
C:Function.prototype(like a normal function) - Prototype of
C.prototype:Object.prototype(which is also the prototype of objects created via object literals)
class C extends B {
}
- Constructor kind: derived
- Prototype of
C:B - Prototype of
C.prototype:B.prototype
class C extends Object {
}
- Constructor kind: derived
- Prototype of
C:Object - Prototype of
C.prototype:Object.prototype
Note the following subtle difference with the first case: If there is no extendsclause, the class is a base class and allocates instances. If a class extends Object, it is a derived class and Object allocates the instances. The resulting instances (including their prototype chains) are the same, but you get there differently.
class C extends null {
}
- Constructor kind: derived
- Prototype of
C:Function.prototype - Prototype of
C.prototype:null
Such a class is not very useful: new-calling it leads to an error, because the default constructor makes a super-constructor call and Function.prototype(the super-constructor) can’t be constructor-called. The only way to make the error go away is by adding a constructor that returns an object.
Why can’t you subclass built-in constructors in ES5?
In ECMAScript 5, most built-in constructors can’t be subclassed (several work-arounds exist).
To understand why, let’s use the canonical ES5 pattern to subclass Array. As we shall soon find out, this doesn’t work.
function MyArray(len) {
    Array.call(this, len); // (A)
}
MyArray.prototype = Object.create(Array.prototype);
Unfortunately, if we instantiate MyArray, we find out that it doesn’t work properly: The instance property length does not change in reaction to us adding array elements:
> var myArr = new MyArray(0);
> myArr.length
0
> myArr[0] = 'foo';
> myArr.length
0
There are two obstracles that prevent myArr from being a proper array.
First obstacle: initialization. The this you hand to the constructor Array (in line A) is completely ignored. That means you can’t use Array to set up the instance that was created for MyArray.
> var a = [];
> var b = Array.call(a, 3);
> a !== b  // a is ignored, b is a new object
true
> b.length // set up correctly
3
> a.length // unchanged
0
Second obstacle: allocation. The instance objects created by Array are exotic (a term used by the ECMAScript specification for objects that have features that normal objects don’t have): Their property length tracks and influences the management of array elements. In general, exotic objects can be created from scratch, but you can’t convert an existing normal object into an exotic one. Unfortunately, that is what Array would have to do, when called in line A: It would have to turn the normal object created for MyArray into an exotic array object.
The solution: ES6 subclassing
In ECMAScript 6, subclassing Array looks as follows:
class MyArray extends Array {
    constructor(len) {
        super(len);
    }
}
This works (but it’s not something that ES6 transpilers can support, it depends on whether a JavaScript engine supports it natively):
> let myArr = new MyArray(0);
> myArr.length
0
> myArr[0] = 'foo';
> myArr.length
1
We can now see how the ES6 approach to subclassing circumvents the obstacles:
- Allocation happens in the base constructor, which means that
Arraycan allocate an exotic object. While most of the new approach is due to how derived constructors behave, this step requires that a base constructor is aware ofnew.targetand makesnew.target.prototypethe protoype of the allocated instance. - Initialization also happens in the base constructor, a derived constructor receives an initialized object and works with that one instead of passing its own instance to the super-constructor and requiring it to set it up.
Referring to super-properties in methods
The following ES6 code makes a super-method call in line B.
class Point {
    constructor(x, y) {
        this.x = x;
        this.y = y;
    }
    toString() { // (A)
        return '(' + this.x + ', ' + this.y + ')';
    }
}

class ColorPoint extends Point {
    constructor(x, y, color) {
        super(x, y);
        this.color = color;
    }
    toString() {
        return super.toString() // (B)
               + ' in ' + this.color;
    }
}

let cp = new ColorPoint(25, 8, 'green');
console.log(cp.toString()); // (25, 8) in green
To understand how super-calls work, let’s look at the object diagram of cp:

ColorPoint.prototype.toString makes a super-call (line B) to the method (starting in line A) that it has overridden. Let’s call the object, in which a method is stored, the home object of that method. For example, ColorPoint.prototype is the home object of ColorPoint.prototype.toString().
The super-call in line B involves three steps:
- Start your search in the prototype of the home object of the current method.
- Look for a method whose name is
toString. That method may be found in the object where the search started or later in the prototype chain. - Call that method with the current
this. The reason for doing so is: the super-called method must be able to access the same instance properties (in our example, the properties ofcp).
Note that even if you are only getting or setting a property (not calling a method), you still have to consider this in step #3, because the property may be implemented via a getter or a setter.
Let’s express these steps in three different, but equivalent, ways:
// Variation 1: super-method calls in ES5
var result = Point.prototype.toString.call(this) // steps 1,2,3

// Variation 2: ES5, refactored
var superObject = Point.prototype; // step 1
var superMethod = superObject.toString; // step 2
var result = superMethod.call(this) // step 3

// Variation 3: ES6
var homeObject = ColorPoint.prototype;
var superObject = Object.getPrototypeOf(homeObject); // step 1
var superMethod = superObject.toString; // step 2
var result = superMethod.call(this) // step 3
Variation 3 is how ECMAScript 6 handles super-calls. This approach is supported by two internal bindings that the environments of functions have (environments provide storage space, so-called bindings, for the variables in a scope):
[[thisValue]]: This internal binding also exists in ECMAScript 5 and stores the value ofthis.[[HomeObject]]: Refers to the home object of the environment’s function. Filled in via an internal property[[HomeObject]]that all methods have that usesuper. Both the binding and the property are new in ECMAScript 6.
A method definition in a class literal that uses super is now special: Its value is still a function, but it has the internal property [[HomeObject]]. That property is set up by the method definition and can’t be changed in JavaScript. Therefore, you can’t meaningfully move such a method to a different object.
Using super to refer to a property is not allowed in function declarations, function expressions and generator functions.
Referring to super-properties is handy whenever prototype chains are involved, which is why you can use it in method definitions inside object literals and class literals (the class can be derived or not, the method can be static or not).
Constructor calls explained via JavaScript code
The JavaScript code in this section is a much simplified version of how the specification describes constructor calls and super-constructor calls. It may be interesting to you if you prefer code to explanations in human language. Before we can delve into the actual functionality, we need to understand a few other mechanisms.
Internal variables and properties
The specification writes internal variables and properties in double brackets ([[Foo]]). In the code, I use double underscores, instead (__Foo__).
Internal variables used in the code:
[[NewTarget]]: The operand of thenewoperator that triggered the current constructor call (passed on if[[Construct]]is called recursively viasuper()).[[thisValue]]: Stores the value ofthis.[[FunctionObject]]: Refers to the function that is currently executed.
Internal properties used in the code:
[[Construct]]: All constructor functions (including those created by classes) have this own (non-inherited) method. It implements constructor calls and is invoked bynew.[[ConstructorKind]]: A property of constructor functions whose value is either'base'or'derived'.
Environments
Environments provide storage space for variables, there is one environment per scope. Environments are managed as a stack. The environment on top of that stack is considered active. The following code is a sketch of how environments are handled.
/**
 * Function environments are special, they have a few more
 * internal variables than other environments.
 * (`Environment` is not shown here)
 */
class FunctionEnvironment extends Environment {
    constructor(Func) {
        // [[FunctionObject]] is a function-specific
        // internal variable
        this.__FunctionObject__ = Func;
    }
}

/**
 * Push an environment onto the stack
 */
function PushEnvironment(env) { ··· }

/**
 * Pop the topmost environment from the stack
 */
function PopEnvironment() { ··· }

/**
 * Find topmost function environment on stack
 */
function GetThisEnvironment() { ··· }
Constructor calls
Let’s start with the default way (ES6 spec Sect. 9.2.3) in which constructor calls are handled for functions:
/**
 * All constructible functions have this own method,
 * it is called by the `new` operator
 */
AnyFunction.__Construct__ = function (args, newTarget) {
    let Constr = this;
    let kind = Constr.__ConstructorKind__;

    let env = new FunctionEnvironment(Constr);
    env.__NewTarget__ = newTarget;
    if (kind === 'base') {
        env.__thisValue__ = Object.create(newTarget.prototype);
    } else {
        // While `this` is uninitialized, getting or setting it
        // throws a `ReferenceError`
        env.__thisValue__ = uninitialized;
    }

    PushEnvironment(env);
    let result = Constr(...args);
    PopEnvironment();

    // Let’s pretend there is a way to tell whether `result`
    // was explicitly returned or not
    if (WasExplicitlyReturned(result)) {
        if (isObject(result)) {
            return result;
        }
        // Explicit return of a primitive
        if (kind === 'base') {
            // Base constructors must be backwards compatible
            return env.__thisValue__; // always initialized!
        }
        throw new TypeError();
    }
    // Implicit return
    if (env.__thisValue__ === uninitialized) {
        throw new ReferenceError();
    }
    return env.__thisValue__;
}
Super-constructor calls
Super-constructor calls are handled as follows (ES6 spec Sect. 12.3.5.1).
/**
 * Handle super-constructor calls
 */
function super(...args) {
    let env = GetThisEnvironment();
    let newTarget = env.__NewTarget__;
    let activeFunc = env.__FunctionObject__;
    let superConstructor = Object.getPrototypeOf(activeFunc);

    env.__thisValue__ = superConstructor
                        .__Construct__(args, newTarget);
}
The species pattern
One more mechanism of built-in constructors has been made extensible in ECMAScript 6: If a method such as Array.prototype.map() returns a fresh instance, what constructor should it use to create that instance? The default is to use the same constructor that created this, but some subclasses may want it to remain a direct instance of Array. ES6 lets subclasses override the default, via the so-called species pattern:
- When creating a new instance of
Array, methods such asmap()use the constructor stored inthis.constructor[Symbol.species]. - If a sub-constructor of
Arraydoes nothing, it inheritsArray[Symbol.species]. That property is a getter that returnsthis.
You can override the default, via a static getter (line A):
class MyArray1 extends Array {
}
let result1 = new MyArray1().map(x => x);
console.log(result1 instanceof MyArray1); // true

class MyArray2 extends Array {
    static get [Symbol.species]() { // (A)
        return Array;
    }
}
let result2 = new MyArray2().map(x => x);
console.log(result2 instanceof MyArray2); // false
An alternative is to use Object.defineProperty() (you can’t use assignment, as that would trigger a setter, which doesn’t exist):
Object.defineProperty(
    MyArray2, Symbol.species, {
        value: Array
    });
The following getters all return this, which means that methods such as Array.prototype.map() use the constructor that created the current instance for their results.
Array.get [Symbol.species]()ArrayBuffer.get [Symbol.species]()Map.get [Symbol.species]()Promise.get [Symbol.species]()RegExp.get [Symbol.species]()Set.get [Symbol.species]()%TypedArray%.get [Symbol.species]()
Conclusion
The specialization of functions
There is an interesting trend in ECMAScript 6: Previously, a single kind of function took on three roles: real function, method and constructor. In ES6, there is specialization:
- Arrow functions are specialized for non-method callbacks, where them picking up the
thisof their surrounding method or constructor is an advantage. Withoutthis, they don’t make much sense as methods and they throw an exception when invoked vianew. - Method definitions enable the use of
super, by setting up the property[[HomeObject]]. The functions they produce can’t be constructor-called. - Class definitions are the only way to create derived constructors (enabling ES6-style subclassing that works for built-in constructors). Class definitions produce functions that can only be constructor-called.
The future of classes
The design maxim for classes was “maximally minimal”. Several advanced features were discussed, but ultimately discarded in order to get a design that would be unanimously accepted by TC39.
Upcoming versions of ECMAScript can now extend this minimal design – classes will provide a foundation for features such as traits (or mixins), value objects (where different objects are equal if they have the same content) and const classes (that produce immutable instances).
Does JavaScript need classes?
Classes are controversial within the JavaScript community. On one hand, people coming from class-based languages are happy that they don’t have to deal with JavaScript’s unorthodox inheritance mechanisms, anymore. On the other hand, there are many JavaScript programmers who argue that what’s complicated about JavaScript is not prototypal inheritance, but constructors [5].
ES6 classes provide a few clear benefits:
- They are backwards compatible with much of the current code.
- Compared to constructors and constructor inheritance, classes make it easier for beginners to get started.
- Subclassing is supported within the language.
- Built-in constructors are subclassable.
- No library for inheritance is needed, anymore; code will become more portable between frameworks.
- They provide a foundation for advanced features in the future (mixins and more).
- They help tools that statically analyze code (IDEs, type checkers, style checkers, etc.).
I have made my peace with classes and am glad that they are in ES6. I would have preferred them to be prototypal (based on constructor objects [5:1], not constructor functions), but I also understand that backwards compatibility is important.
Further reading
Acknowledgement: #1 was an important source of this blog post.


